A garment can be perfectly sewn and still fail - because the chest is 2 cm too small. Measurement defects are among the most common reasons for failed final inspections, and the most avoidable.
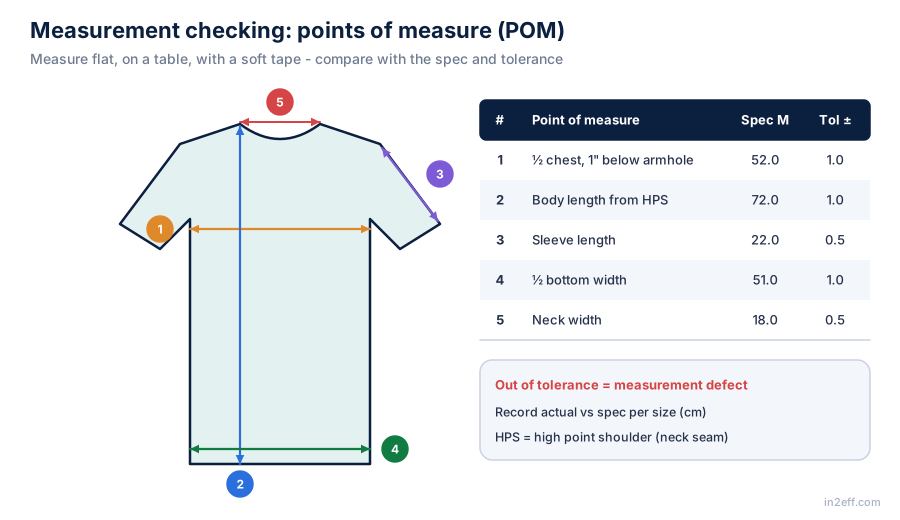
The measurement chart
The buyer's spec sheet lists for each size:
- POM (point of measure) - exactly where and how to measure, often with a code and a sketch.
- Spec value for each size.
- Tolerance (±) - the allowed difference.
| POM | Description | S | M | L | Tol ± |
|---|---|---|---|---|---|
| A | ½ chest, 1" below armhole | 50 | 52 | 54 | 1.0 |
| B | Body length from HPS | 70 | 72 | 74 | 1.0 |
| C | Sleeve length from shoulder point | 21 | 22 | 23 | 0.5 |
| D | ½ bottom width | 49 | 51 | 53 | 1.0 |
| E | Neck width, seam to seam | 17.5 | 18 | 18.5 | 0.5 |
How to measure correctly
- Lay the garment flat on a smooth table, without stretching; smooth out wrinkles gently.
- Use a soft tape in the unit of the spec (cm or inch) and check the tape against a steel rule regularly.
- Measure exactly as the POM description says (for example "1 inch below armhole", "from HPS").
- Knit garments: measure relaxed, not stretched; measure after the garment has rested if it came off pressing.
- Record the actual value, not just "OK".
Recording and judging
Record actuals per size and highlight out-of-tolerance values. Look for patterns, not single pieces:
| Pattern | Likely cause |
|---|---|
| All sizes short in length | Shrinkage after wash, pattern not adjusted |
| Only one size out | Grading error or wrong pattern piece |
| Random variation across pieces | Operator seam allowance, poor cutting, stretching |
| Chest small only on some bundles | Shade/lot with different shrinkage, cutting lay |
When measurements go out
- Stop and check the pattern and marker against the spec.
- Check shrinkage test results - adjust pattern allowance if needed.
- Check cutting accuracy (top and bottom plies of the lay).
- Check seam allowances at the critical operations; use guides or folders.
- Re-measure a sample after the fix and keep the record.
Tip: Measure garments at cutting (panels), inline, end-line and after finishing. Shrinkage from pressing or washing can move measurements after sewing.
Key points
- Measure flat, relaxed, exactly per POM.
- Record actuals by size and look for patterns.
- Find the cause in pattern, shrinkage, cutting or sewing - not just in the inspector's tape.